
In this article, we will be covering how to use the blog component via the widget. This is part of a series for using the widget feature to host components on your website.
First, you should understand how the web components work. Normally, you would be importing the web components to your project with all of the dependencies. With the widget feature, however, you can add the web component to any website by simply copying and pasting the widget code onto a page. This can be a very useful tool if you are using a website builder or CMS for your project that could have limitations to customizability.
Below are the steps to quickly add the blog component to any website.
Step 1. Subscribe to a Skhemata subscription plan
Go to Skhemata’s pricing page and choose the plan that suits you the best. You will be provided with GIT access to the component code. You can also find the full source code for the blog component by going here.
Once you have access to the source code, you can then begin to use it in your project. The code linked above is only the source code for the widget. This is the same code that is hosted on the Skhemata CDN with jsdelivr. It is, however, not the widget code itself. That will be provided later in this article.
Step 2. Create a WordPress blog instance
In order to use this component, you will need to create a headless WordPress blog. No one will be able to see this instance, you will just be using it to create articles and display them in your project.
Creating a new WordPress instance is not difficult thanks to the great hosting services out there. There are many one-click installs for WordPress, so for this article, we are not going to cover how to install WordPress or use it as there are many resources already available.
Once you have a WordPress instance, you will need to connect it to the widget. This will be explained in the next step. Before doing so, it is recommended to create a few articles or placeholder content so you can see what the blog will look like when it’s ready.
Step 3. Copy and paste the widget code
Now that you have a WordPress instance up and running, you can then start connecting it to the widget. To do this, you will need to copy the following code from codepen.
Copy and paste the code from codepen into your project. When you do this, you will notice that it will display content from another blog. Don’t worry, we will show you how to connect your own blog content to the widget.
Step 4. Customize the component
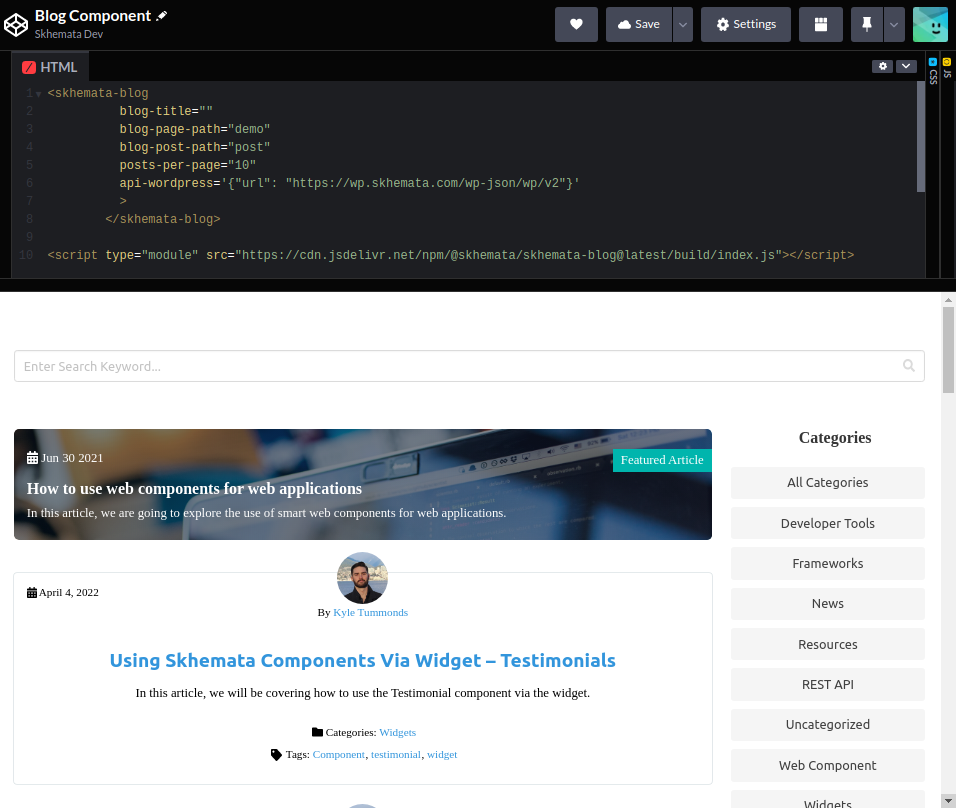
First, if you would like to display your own content, you will need to replace the API link in the widget code. Look for the attribute called api-wordpress, and replace the URL that you see. Right now, the URL is set to https://wp.skhemata.com/wp-json/wp/v2, you can replace this with your URL.
Be sure to keep the /wp-json/wp/v2 at the end of your URL as this is the path for the API. You will then see the content that you added in the second step.
Let’s take a look at some of the other attributes that you can use to customize the component. First, will see that there’s an attribute called post-per-page. This attribute is referring to the number of posts on the component. So you can control how many posts you would like to be displayed. You may notice that there are other attributes such as blog-title, blog-page-path, and blog-post-path. You can leave these as they are if you would like. The blog-title, you can add as your own, that will not make any difference noticeable difference to the component. The blog-page-path is used for window.history which is an object in the browser containing history for the specific tab. That can be left as it is. The last attribute blog-post-path is for blog categories but is not used at the moment.
You may also notice that there’s an area for a featured article. If you would like to add a featured article you would need to create a category called ‘Featured Articles Landing‘ and add the category to one article. You can only use one single article in this section. After it’s been added, it should display the article at the top of your blog. Make sure that you add a featured image. This image will become the background for the featured article section.
After all of the custom information for your blog has been developed, you can reload the page to see your changes live.
Some additional customization that you can make to the component would be adding custom CSS to target specific elements of the widget to make it look different.
Further customizations may only be possible if you are importing the entire component into your project rather than using the widget method so you can access and modify the source code directly. Right now, your source code is being delivered through Skhemata’s CDN which you do not have access to.
If you have any questions about how the components work or need help with using them, you can contact Skhemata support on the community Discord chat.